
I finished enabling commenting on the site using Commento and wanted to take a second to talk about the other commenting options, setting it up locally and how well it integrated with Jekyll and the Minimal Mistakes theme I’m using.
Options for commenting
First up I checked out what the Minimal Mistakes theme had to say about configuring comments. It seems like there is a toss up between the dynamic options such as Discourse and Disqus and the static options such as Staticman. The dynamic options being easier to setup/maintain and the static options enabling much faster page load speeds.
![]()
Happy to get my hands dirty I investigated how Staticman works first. From what I understand, the concept is that when users make comments it triggers the Staticman bot to initiate a PR against the site’s repo in Github, so that it can be merged and then part of the static content of the site from then on. If you’d like to moderate the comments, you can choose to review each of them before merging. Or alternatively you can give the Staticman bot permission to write to the repo and merge directly to master for publishing automatically. I can understand the benefits for loading speeds using this method but it just doesn’t feel like each comment should be a separate PR and commit to the site’s repo, this option really feels like a workaround.
So what of the dynamic options? While investigating others that had used either Disqus or Discourse I came across a few people that spoke about converting from one of these to Commento for page load times. A quick benchmark they ran showed it was up to 10 times faster. That seemed like it was worth investigating further.
Setting up Commento
Commento’s focus seems to be on a commenting system that is fast and lightweight. Boasting just 11KB for the gzipped, minified JavaScript and CSS component. It supports upvoting of comments and markdown formatting. It was also the winner of a Mozilla Open Source grant.
A cloud version is available, which is a paid service. Again, wanting to tinker and learn a little, I decided to try hosting my own version locally. It’s written in Go (which I’m a big fan of) and requires a connection to an SQL database.
The docs are a fairly good source for support but to summarise, setting it up was relatively simple:
-
Head to the releases page and grab the tar ball with binary and content. Download, extract and place somewhere sensible on the server where you can run it.
-
Set up an SQL instance. I opted for a local Postgres instance. Create a
commentodatabase and user. -
Create a config file with details such as the URL for hosting, PORT to host on, SQL details and SMTP config (required for signing up).
Note: If you’re using gmail for the SMTP details, remember to use App Passwords instead of your actual Google account password for additional security.
-
Add it as a
systemdservice and enable it.# commento.service [Unit] Description=commento After=network.target [Service] User=commento Environment=COMMENTO_CONFIG_FILE=/etc/commento.env ExecStart=/var/lib/commento/commento [Install] WantedBy=multi-user.target
Once the service is running you can test it out - you’ll see a login page where you can also sign up to create a new account. Once you’ve logged in you’ll have the option to register your domain. This is so when the Commento snippet on the page runs it can check that the given domain is known. If you’re wondering, like I did, how to prevent others from freeloading by creating accounts on your Commento server and registering their own domains, I’m glad you asked because it wasn’t obvious to me - once you’ve created your account you need to add the following line to your config file to prevent others from doing the same:
COMMENTO_FORBID_NEW_OWNERS=true
To get started, I was simply hosting Commento on an unused port to check that everything was working ok. But following the principle of always HTTPS, I started looking at how I could reverse proxy it through my Caddy server. My first thought was to host it under another path, but I noticed I was getting 404s when I tried this. It’s a known issue that’s unresolved it seems.
I considered how I could host it under another subdomain such as commento.jaspa.codes but when I initially thought how the DNS would be set up, I started thinking I’d need to set up another server just so it could be forwarded to a different IP address, which seemed like overkill. Of course I’m an idiot and that’s not the case at all: if you just set it up as an ALIAS for your main domain, you can filter these requests in your reverse proxy depending on what host the request used.
In Caddy that just means adding another handler:
...
{
  "handle": [
    {
      "handler": "reverse_proxy",
      "upstreams": [
        {
          "dial": "127.0.0.1:8000"
        }
      ]
    }
  ],
  "match": [
    {
      "host": [
        "commento.jaspa.codes"
      ]
    }
  ]
}
...
Adding it to the site
The final note in the Commento docs informs us that adding the following snippet on your page is the only thing required to get it running.
<div id="commento"></div>
<script defer
  src="http://commento.example.com/js/commento.js">
</script>
And the Minimal Mistakes docs for comments tells us:
Other comment providers: set provider: "custom" then add the embed code to _includes/comments-providers/custom.html.
Which is easy enough, but doesn’t have the desired result - thinking that it’s only a script, Minimal Mistakes adds the above snippet to the bottom of the page, below the footer. As the Commento script inserts the comment section into the <div> tag in the snippet, it means you get comments right at the bottom of the page.
To save everyone else from digging through Minimal Mistakes code, it looks like it’s intended that you search for the #custom-comments section and embed your comments there, which is conveniently placed where you’d expect comments - below the post.
That results in the following code within the custom.html file above:
<script defer src="https://commento.jaspa.codes/js/commento.js"></script>
<script>
  'use strict';

  (function() {
    var commentContainer = document.querySelector('#custom-comments');

    if (!commentContainer) {
      return;
    }

    var div = document.createElement('div');
    div.setAttribute('id', 'commento');
    commentContainer.appendChild(document.createElement('br'));
    commentContainer.appendChild(div);
  })();
</script>
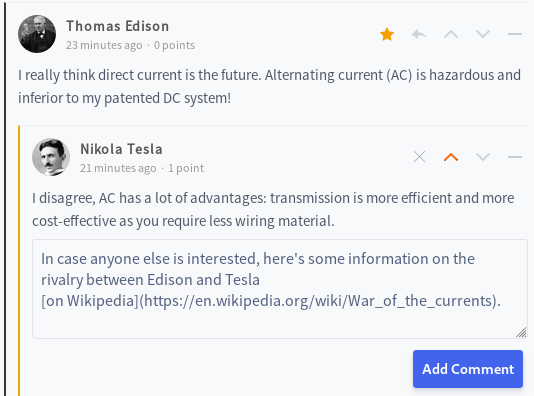
We have comments on the page!
Note: If you’re testing this locally, remember that Minimal Mistakes only adds comments in production. If you want to test it when running locally use: JEKYLL_ENV=production bundle exec jekyll serve --watch
Using OAuth for login
To prevent users from having to create new accounts just to comment on the site, I started looking at how to set up OAuth via other well known providers - Google, Gitlab, Github and Twitter are supported.
Note: Anonymous comments are also supported, it’s a configuration option you can enable for your domain once you’ve logged into the Commento page with your admin account.
For most of the above providers the process is pretty much the same:
- Login to the provider with your account
- Find the developer section where you can create a new App
- Create the App, giving details such as a title, description, URL e.t.c.
- Give the redirect URL:
https://commento.example.com/api/oauth/<service>/callbacki.e.https://commento.example.com/api/oauth/twitter/callback - Get the Key and Secret and add it to your Commento config file
The only hurdle I had was with Twitter - Commento requires you to retrieve the user’s email and Twitter only provides the user’s email if you link to a Privacy and Terms of Service agreement, which I didn’t feel like creating.
Thoughts on Commento
I’m happy with the resulting solution I’ve got set up with Commento, the site loads quickly, it’s easy for users to comment and for me to maintain. There were a few things unclear but the main parts of the set up required to host it locally are quite quick.
My first impression when working with it was that there felt like a push to the paid version - there’s no obvious mention of a self-hosted version on the main page and it feels like there’s a lot of outstanding issues in the open source version. But knowing how much effort is involved in maintaining open source projects and how little developers are usually paid for this, if at all, I’m just really grateful that there IS a free option at all.