
The new Raspberry Pi 4
With some time to spare during lockdown 2020 I decided to buy myself one of the new Raspberry Pi 4s. They’ve come a long way since the first model was released, they’re now sporting up to 4GB RAM, 1.5GHz quad core, 2 mini HDMI ports capable of 4K resolution and something I’m very grateful for - on board WiFi and Bluetooth. I had one of the original Raspberry Pi models back in 2012, and connectivity was always tricky when I had to use up the 2 USB ports for Bluetooth and WiFi adapters. They even have hardware decoding for 4K movies (4kp60 H.265), but it seems like the software is still catching up with limited support so far.

This kit from LABISTS seemed to be a good set up, with a case, heatsinks, fan, HDMI cables, power cables (/w switch), it wasn’t much more than the price of the Raspberry Pi itself. Putting it together took only a few minutes and I’ve been pretty happy with it so far. After about a week of use the fan started to make some terrible noises and to be honest it wasn’t overly quiet to begin with, so I disconnected it. I kept an eye on the temperatures with:
pi@raspberrypi:~ $ vcgencmd measure_temp
temp=58.0'C
And even when playing 1080p content it barely went above 62, well below the 80 where it would start to throttle itself.
My old RPi project
Everyone enjoys a little tinkering. “Wouldn’t it be cool if it could…!”.
Back in 2012 when I had the original Raspberry Pi, Bluetooth speakers were just becoming popular and Sonos was the bees knees of in-house audio set ups. I’d just been to a wealthy family friend’s house in Germany who had a Sonos set up and was overcome with the idea that I could get music to play in any room of the house with a central control system.

My first project with the RPi was a smart Bluetooth capable speaker that would also connect to your home WiFi to allow for Apple AirPlay. Also, Qi wireless charging had just started to become a thing, so I had the idea to add a battery to the set up which I could wirelessly charge. You’d have a speaker which could sit in your home charging on its mat, streaming music and when you wanted to go outside you could pick it up and continue the party with another few hours of battery life. When you get home, just drop it on the mat, play some tunes and it’ll charge up again, no cables. Even today it seems like a good idea. Does something similar exist?
What I created was akin to Frankenstein’s monster. The RPi was in a white plastic box /w a WiFi adapter sticking out, I was using a portable Laptop speaker which was about twice as long as the RPi box and then came the Qi chargeable battery, a large black rectangle, dangling precariously at the bottom, holding on for life via the tiny micro USB power cable. Not the elegant, slim form factor I had in mind but I thought I’d leave the hardware design to a point in the future when the devices were perceptibly closer to the point of mass adoption.
It worked… mostly. The hiccup came when I dropped the device on the Qi charging mat. It would charge fine, but the initial point that I dropped the device on the mat would trigger a power spike which would restart the RPi. But regardless of the result it was great to have an evening project to tinker away at.
Setting up and controlling the RPi
For the new RPi I primarily wanted a media box I could hook up to the TV that would offer me the following three things:
![]()
A media player (Kodi) that I could connect an external HDD to so I could play movies and TV shows.
![]()
A RetroPie box that I could use to play all the SNES and Mega Drive games I remembered.
![]()
A device I could stream games from my PC to, using something like Moonlight.
Each of these was installed and set up, mostly successfully (RetroPie wasn’t officially supported on the RPi4 at the time, so there were some issues with intermittent crashes and black screens). To control the RPi, I was originally SSH’ing or VNC’ing into it via either my laptop or phone. However, controlling something like Kodi (a full screen media player) doesn’t work well for this, so I started to look for a wireless keyboard and trackpad device. I originally had in mind a full size keyboard with trackpad extension on the side, but soon came across ones which were considerably smaller, akin to the size of another remote. I decided on this one from Riitek ultimately.

But that wasn’t enough. It’s not that double clicking some shortcuts on the Desktop was overly taxing, but I wanted an easier way to run these things. Wasn’t this the year 2020? If I can’t have flying cars I’m at least going to take advantage of the massive gains we’ve made in voice recognition in the last few years. We had some Google Home devices lying around the house which we were using more frequently and I’d seen from IFTTT (If this then that) it was possible to design custom commands.
An overview of the solution
In one sentence then, what I wanted was to be able to ask the Google Home to run an application and for that application to be launched on my Raspberry Pi. This would work via IFTTT’s Google Home integration, which allows you to create custom commands, which can then trigger Web Hooks on a specified web server. The idea then was that I’d run a simple node.js server on the RPi, which would listen for incoming commands from IFTTT and execute them as shell commands. Simple enough.
And in fact, creating a prototype took me only a few hours. But isn’t it always the case - fixing up the last 20% of the solution takes 80% of the time. The classic developer dilemma. I showed my dad the prototype and he was suitably impressed, but days afterwards while I said I was still working on networking issues I could see the eyes of a manager looking back at me, wondering what ‘minor’ things I was tinkering on day after day when the solution was already ‘finished’.
Creating the custom command in IFTTT
![]()
For anyone not familiar with IFTTT, it’s essentially a free web based service that can execute commands based on certain events or conditions, which it calls applets. A big part of the new Internet of Things. For example, you might use an applet that uploads a photo to Facebook whenever you take one or another that switches on the outside lights when you’re close to your home.
Each applet is separated into the condition to be met and the action to be taken. For my purpose, the condition would be a custom command I would create using the Google Assistant integration and the action to be taken would be a Web Request.
For the custom Google Assistant command, you can specify a couple of different ways you would say the phrase you’ll use to trigger it. A $ is used to mark the spot in the sentence which will contain any variable input, i.e. in my case, which application I’d like to execute.
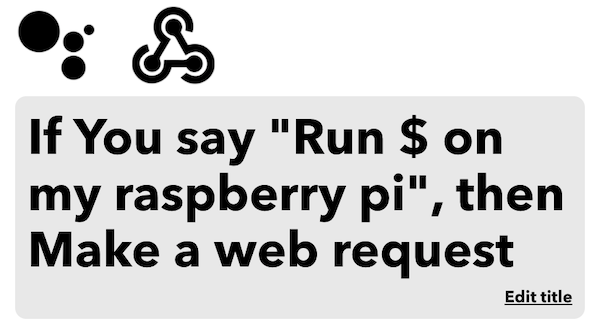
On the Web Request side, you tell IFTTT the URL of the web server you’d like to send the request to, the format of the message (I chose JSON), and then the content. Within the content itself you can use the fields CreatedAt, which will give the date the event was triggered and the most important TextField, which will give you the variable input (the $ above), i.e. in our case, which application the user asked to run.
As I hadn’t quite figured out the networking side of things yet, I was using a temporary ngrok URL for the time being to host my local web server. But I’ll talk more about this later in the networking section.
The web server to receive commands
For the server that would receive commands from IFTTT, I used node.js and the express library to write the web service. Once the endpoint for the RPi command is run, it executes shell commands using shelljs to start each of the respective applications. There’s not a lot of code to it. I’ve kept it as a private project in Github for the time being but if anyone is interested I’d be happy to share it.
To keep things simple there are a limited amount of commands it can execute, one for each of the three applications I mentioned above. As I figured the Google Assistant may spell things differently (Cody instead of Kodi for example), for each command, I had a list of possible words that would trigger it. To separate this out from the code this is all stored in a JSON config file which lists the commands and the keywords for them.
"commands": [
  {
    "cmdList": ["kodi", "cody"],
    "execute": "kodi &"
  },
  {
    "cmdList": ["moonlight", "moon light"],
    "execute": "moonlight &"
  }
...
Using systemd
This set up worked well, but at some point I wanted to also be able to restart the Raspberry Pi or quit the current running application. I had a few issues initially with the rpi-assistant service losing focus so decided to start and stop (quit) each application as a service using systemd, which worked a lot better.
I had some issues to start with when attempting to quit Kodi and RetroPie leaving me with a black screen, but it was clear the RPi was still running. After looking into it I found that apparently they use chvt to use a new virtual terminal when starting. If you use each application’s quit command they correctly chvt back to the Desktop, but when you kill each of these processes it doesn’t do this. For that reason then, I needed to add a post-quit script:
#!/bin/bash

sleep 10
sudo chvt 7
Apparently the default (Desktop) virtual terminal is always 7.
Networking
NOTE: I feel it’s important to say first up that the below solution doesn’t feel AT ALL like best practices. I’ve since come across Traefik, which I think might be a better solution. If I switch to this I’ll add a new post.
The above was all working well, but there was a small hiccup on the networking side. As I was using ngrok to make the service public, it would use a randomly generated URL. So unless I wanted to change the URL in IFTTT every time the RPi restarted (hint: I didn’t) I needed a better solution. The obvious solution would be to upgrade to an ngrok pro plan, which enables you to reserve a sub domain for yourself that wouldn’t change, but I had my jaspa.codes domain (tied to a simple AWS instance) already and was in the mood for some tinkering.
The solution I had in my mind was that I’d run a reverse proxy on jaspa.codes which would redirect to the ngrok URL on the RPi. Whenever the rpi-assistant service started then, it would need to tell the reverse proxy what the newly generated ngrok URL that it needed to forward to was. I needed to be able to dynamically update the config of the reverse proxy.
So I started Googling. I was fairly familiar with nginx so I looked at what support it had for updating config dynamically. From what I could gather, it seemed only the paid version, nginx plus, would support this. Searching a little further I came across Caddy - an open source web server, written in Go, with automatic HTTPS, that provided an API for updating config. It seemed like a good fit, so I looked at the docs and tried it out.
Configuring Caddy
![]()
Setting up a reverse proxy in caddy is as easy as:
caddy reverse-proxy --from :2016 --to 127.0.0.1:9000
But as we’ve seen before in that 80/20 rule, getting a solution that ticked all the boxes for me took a couple of days of tinkering.
What I wanted from Caddy was:
- To handle the auto HTTPS and SSL certificate with Let’s Encrypt for the
jaspa.codesdomain - To create a reverse proxy from a suitable endpoint on
jaspa.codesto the ngrok URL of therpi-assistantservice - To host some static content for the
jaspa.codessite, i.e. what you’re reading now - To allow for the ngrok URL to be updatable via an API that can be secured with a secret
The first point was relatively simple. Caddy attempts to handle HTTPS and SSL certificates by default, once you specify your domain in config. This probably would have gone along swimmingly if I hadn’t forgotten to open port 443 in the firewall, causing repeated requests for my Let’s Encrypt certificate to fail and get me rate limited.
The second and third points are also relatively standard things to be using Caddy for, the trick comes in when discovering the three ways you can configure Caddy, from simplest to most complex/configurable they are:
- From the command line using options
- Using a CaddyFile, which looks similar to nginx or other server config files
- Using what the Caddy process will convert the above two options to ultimately - a JSON config file
Considering the API that Caddy provides works exclusively in JSON and I needed to be able to use that API, ultimately I’d need to use and understand the JSON config structure anyway. The docs for this show an overwhelming amount of options, so I figured a better bet would be to use a CaddyFile to create the config I wanted, then query the API to see what that looked like in JSON world.
Creating a secure admin API
The last point, having a secure admin API for the config that I could access from the Raspberry Pi, proved to be the most difficult. Most likely because Caddy wasn’t really designed to be doing this. Sure, it provides an admin API, but it fully intends for you to be using that via localhost, allowing external access is deemed a security risk it seems (fair enough) and it doesn’t really make this an easy option. My thinking was, if I could secure access to the admin API endpoint with basic auth, via HTTPS, this would go far enough for me to keeping it secure.
So, as a first approach we need to set up the following:
- Create a reverse proxy from an endpoint on
jaspa.codeswhich redirects to the admin API locally - Secure that endpoint with basic auth
Expand to see config
...
"routes": [
  {
    "handle": [
      {
        "handler": "authentication",
        "providers": {
          "http_basic": {
            "accounts": [
              {
                "password": "HASHED_PASSWORD",
                "username": "user"
              }
            ],
            "hash": {
              "algorithm": "bcrypt"
            }
          }
        }
      }
    ],
    "match": [
      {
        "path": [
          "/config/*"
        ]
      }
    ]
  },
  {
    "handle": [
      {
        "handler": "reverse_proxy",
        "headers": {
          "request": {
            "set": {
              "Host": [
                "localhost:2020"
              ]
            }
          }
        },
        "upstreams": [
          {
            "dial": ":2020"
          }
        ]
      }
    ],
    "match": [
      {
        "path": [
          "/config/*"
        ]
      }
    ]
  }
]
...
A note to point out - we need to also make sure we set the request Host header to localhost so we can trick the admin API into thinking we’re being secure…
So, how well does this work? The /config/* endpoint is secured with basic auth: check! We can read the config from this endpoint: check! And when we attempt to make a change to the config by POSTing back to the config it… hmmm, seems to hang. I found a post where someone else attempted this - the Caddy author responded saying:
Your HTTP server reverse-proxies to the admin endpoint. The admin endpoint is commanded to load a new configuration, so it shuts down the HTTP reverse proxy (gracefully). The reverse proxy is waiting for the upstream request to complete, which is in turn waiting for itself to shut down, so… yeah… it’s a circular dependency: the admin endpoint and the reverse proxy are both waiting for each other to stop first.
The solution? Split it up into two Caddy processes - one to reverse proxy the admin API, whose config remains static and another for the real config, with the ngrok reverse proxy and the static file server, whose config can be updated (without hanging). Hooray! We’re in business!
Summary
And that’s all there is to it… Phew, this was a longer post than I expected.
I really enjoyed having the time to work on this project and it has held up reasonably well so far. There’s a limited amount of commands I’m using the assistant for at the moment, but there are plenty of other options:
- Show photos of things such as animals or famous people
- Load a specific website
In my research I also came across the protocol used by HDMI devices to control each other: Consumer Electronics Control - perhaps it can be used to control the TV via the Raspberry Pi.
I’d love to hear from anyone that read the post though. Was it clear? Are you working on something similar? Any thoughts on things to add?