
Hacking something with Chainlink
Recently Chainlink had a Hackathon to create some new projects that use their system of Oracle nodes. For those unaware, in the smart contract world (i.e. Ethereum) the code that runs doesn’t have access to the internet, hence if you need something like pricing data, you need to ask a contract which has access to the outside world, these are called Oracles. Chainlink has its own token, called LINK, you pay Oracles LINK to execute these requests.
The winner of the Hackathon was Link My Ride, which enabled people to hire out their Tesla to others and have it payable via a smart contract. Check out the video of it in action below:
At the time I was a little busy with other things, but I had the concept of a Dapp (Decentralised App) that would have a way to pay SEO (search engine optimisation) companies that improved the search ranking of a client’s site. With a little more free time, I’ve now had a chance to throw a prototype together.
The concept
Working with NGOs over the past few years I was pretty familiar with the idea of pay for performance, i.e. how much you complete of your goal is how much you get paid. There’s certainly drawbacks to the concept but I really liked the simplicity of it.
So for CryptoSEO I tried to make an enforceable pay for performance smart contract for SEO. While I’m still not entirely sure about the practicality as a business concept, the principle is simple enough. I’ll explain with an example:
Jim, the CEO of CryptoBetting.com would like to improve his site’s search ranking in Google for the search term “crypto betting”. They are currently #15 and would like to move to the front page (i.e. in the top 10). Jim is approached by Wendy from SEOPro who assures him they can help with this. Jim wants assurance that he’ll get the results he’s after. Wendy lets him know that in order to guarantee Jim will only need to pay if they perform as expected, they can use CryptoSEO - it will allow them to set up a commitment so that Wendy is paid in Ether for each increase in search ranking (above the initial #15) after a specified amount of time, up to a set maximum payout. Jim creates the SEO commitment by entering the details of the search, the payment details, a timeout (or execution date) of 30 days in the future and transferring the max payout amount which is held in the commitment. As the commitment details are all public and transparent, Wendy can see them as well and can get to work safely in the knowledge that she’ll be paid for her efforts. After 30 days, with Wendy and her team’s help, the search result for CryptoBetting.com went up to #5, an increase of 10 places! CryptoSEO pays Wendy for her work and then refunds Jim any leftovers. Everyone’s happy!
How it works
To implement my idea I needed the following pieces:
- A simple React frontend for creating the agreement and interfacing with the smart contract.
- The smart contract itself, which would store a list of agreements created and execute them when the time is up.
- A simple webserver with an API which would do the Google Search and return the ranking, compatible as a Chainlink ‘external adapter’.
- A Chainlink node which is aware of my custom Google Search adapter and can execute jobs on it when requested by smart contracts.
The frontend
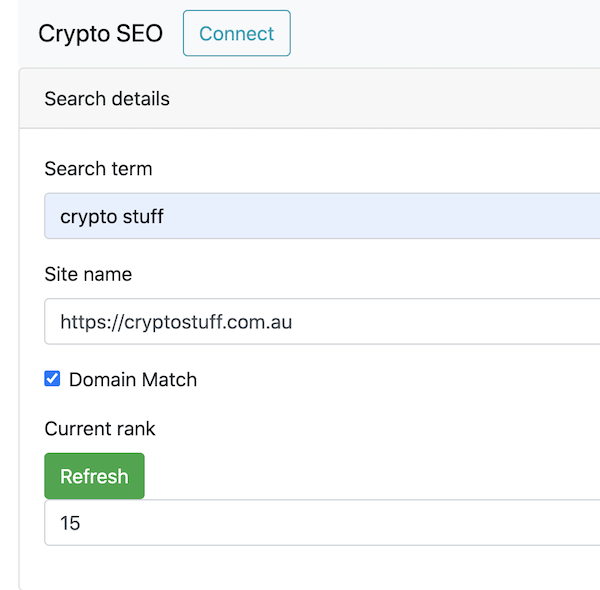
I used code from this Dapp development guide from 2017 which helped create a very simple lottery you could bet on, with a React frontend. It was good to get started, but as might be obvious turned out to be a little outdated. Things in the smart contract development space move VERY quickly. I feel like every few months each major software piece releases a breaking change.
I replaced the .css with Bootstrap, set up the new form elements to create the contract and then replaced the code which interacts with the contract with something more up to date. The page calls my Google Search adapter directly to get the initial search ranking.

Updating the code to interface with the smart contract took some time to trawl through different docs, from web3.js to Metamask. web3.js is a library which allows you to interact with an ethereum node and Metamask is a browser extension which stores Eth wallets. They’re the defacto standard for the time being.
It looks like previously if a user had Metamask installed and then went to a website that used web3, the site could essentially just ask for the users Eth wallet info from Metamask and receive it (obviously not private keys though), which seems like a big security issue. Even though this has been “deprecated”, I’m still not sure it’s completely gone. The new method has the site go through a UX which requests the user to connect Metamask to the site, allowing it to receive your account info. From there you can see which network the user is connected to (mainnet or one of the test nets) and then call and send transactions to contracts. If the user returns to the site, you don’t need to request again.
Getting this flow to work correctly wasn’t simple, here’s the code in question:
On site load, check for the ethereum global, instantiate the Web3 object and set up listeners for accountsChanged and chainChanged:
if (ethereum) {
  console.log("Using web3 detected from external source like Metamask")
  this.web3 = new Web3(ethereum)
  ethereum.on('accountsChanged', this.handleAccountsChanged)
  ethereum.on('chainChanged', this.handleChainChanged)
  ethereum.autoRefreshOnNetworkChange = false
} else {
  console.error("No web3 detected.")
  return
}
A connect button on the site requests access to the user’s accounts, which prompts the Metamask dialog, if granted it triggers accountsChanged:
connectEthereum() {
  ethereum
    .request({ method: 'eth_requestAccounts' })
    .then(this.handleAccountsChanged)
    .catch((err) => {
      if (err.code === 4001) {
        console.log('Please connect to Metamask.')
      } else {
        console.error(err)
      }
    })
}
And chainChanged will be called after the Connect button is hit, or if the user has already confirmed and returns to the site. It needs to look up if the CryptoSEO contract is deployed to the given network:
handleChainChanged() {
  const networkId = String(parseInt(ethereum.chainId))
  if (CryptoSEO.networks[networkId] == undefined) {
      console.error("CryptoSEO contract not deployed to this network")
      return
  }
  this.state.CryptoSEOContract = new this.web3.eth.Contract(CryptoSEO.abi, CryptoSEO.networks[networkId].address)
}
The code for creating each new agreement is simplified here, which will prompt the user to pay for the creation of the agreement in their Web3 client (probably Metamask):
this.state.CryptoSEOContract.methods.createSEOContract(...params...).send(
  {value: callObj.maxAmtEth, from: this.state.currentAccount},
  (err, result) => {
    if (err) {
      console.error(err)
    } else {
      console.log(result)
    }
  })
The smart contract
The contract itself is very primitive for the time being, and presumably filled with security holes as I haven’t gone beyond “oh look it worked!” just yet.
At creation, it just checks you sent enough Eth with some other validity steps and then adds to the map, returning the new contract id:
NOTE: I’ve used js as the type for the code below as there’s no markdown highlighting for Solidity just yet.
  function createSEOContract(...params...) public payable returns (uint256) {
    require(msg.value == maxPayableEth, "Eth sent didn't match maxPayableEth");
    require(maxPayableEth > amtPerRankEth, "maxPayableEth must be larger than amtPerRankEth");
    require(initialSearchRank > 0, "initialSearchRank must be non-zero");

    SEOContract memory cont = SEOContract(...params...);
    seoContractList[numSEOContracts] = cont;
    numSEOContracts++;
    return numSEOContracts - 1;
  }
When you execute, it checks enough time has passed and then sends off the request to the Oracle to fetch the current search ranking. I used this TestConsumer.sol code to look up how to call Chainlink Oracle’s. Once the Oracle returns with the result, the callback fulfillContract is where the payout happens:
  function fulfillContract(bytes32 _requestId, uint256 _rank)
    public
    recordChainlinkFulfillment(_requestId)
  {
    // Ensure we're only called as a callback from the Oracle
    require(msg.sender == oracle, "This function can only be called by the Oracle");

    emit RequestGoogleSearchFulfilled(_requestId, _rank);

    SEOContract memory cont = procContractList[_requestId];
    delete procContractList[_requestId];

    if (_rank == 0 || _rank > cont.initialSearchRank) {
      // Search rank was worse, return funds to payer
      cont.payer.transfer(cont.maxPayableEth);
      return;
    }
    uint256 payForRankInc = (cont.initialSearchRank - _rank) * cont.amtPerRankEth;
    if (payForRankInc > cont.maxPayableEth) {
      cont.payee.transfer(cont.maxPayableEth);
      return;
    } else {
      uint256 refund = cont.maxPayableEth - payForRankInc;
      cont.payee.transfer(payForRankInc);
      cont.payer.transfer(refund);
      return;
    }
  }
The Google Search adapter
The adapter code was based on this template given by Chainlink for writing custom external adapters (at the time of writing this there’s a bug which I submitted a PR for where the Validator has the wrong number of args).
After that, it was fairly trivial to incorporate an NPM lib called google-it which calls Google Search and returns a list of results:
  googleIt({"query": term}).then(results => {
    var siteRank = 0
    for (var i = 0; i < results.length; i++) {
      var resURL = new URL(results[i].link)
      if ((domainMatch && resURL.hostname == site.hostname) ||
       resURL.href == site.href) {
         siteRank = i + 1
         continue
      }
    }

    var response = {
      data: { rank: siteRank, result: siteRank },
      status: 200,
      result: siteRank
    }

    callback(response.status, Requester.success(jobRunID, response))
NOTE: Google REALLY doesn’t like other apps using their search engine and apparently it’s quite easy to get your IP blocked by making too many requests using anything like the library above.
Running the Chainlink node
The Chainlink docs are pretty good for running your own Chainlink node. I opted to run it locally using Docker.
The Chainlink node will also need access to an SQL instance for storage as well as an Ethereum node to allow it to communicate on-chain.
The two prime candidates for Eth nodes seem to be Parity and Geth. As Parity is going through a transition to OpenEthereum I opted for the Geth client. After installing it, I used the following to run a light-sync node to the Rinkeby network:
geth --rinkeby --ws --ipcdisable \
           --wsaddr 0.0.0.0 --wsorigins="*" --datadir ~/.geth-rinkeby --syncmode light --rpc
After that was synced (200MB later), my Postgresql instance was running and all the config for my Chainlink node was created, I ran it with:
docker run -v ~/.chainlink-rinkeby:/chainlink -it --env-file=.env -p 6688:6688 smartcontract/chainlink local n -p /chainlink/.password -a /chainlink/.api
Once the Chainlink node is up, you need to add a Bridge which connects to your external adapter, and then a Job which uses this Bridge. After that, you just need to deploy an Oracle contract (code supplied by Chainlink) which your Chainlink node uses to communicate with requesting contracts and you’re done.
Summary
The code is all public, so anyone can browse here: CryptoSEO. Although I’d STRONGLY suggest against actually attempting to use it in anyway, as I said I haven’t even given it a glance for security problems yet.
I’m happy to see a working prototype up and running, but when I get more time there’s a long list of things I’d like to add to this, including:
- Security check the smart contract
- Add tests to the smart contract
- Better error handling everywhere
- Allow users to view SEO agreements already deployed
At the moment there’s no deployed site for people to view. The Chainlink node requires a decent server and I don’t think I’m ready to ask other nodes to host the external adapter yet. I’ll look at this in the future though.
Update I’ve now finished working on finishing off this prototype and hosting it for others to test. See more details in the next post here.